How to Check USFans Sizing and Measurements Before Ordering
Learn how to check USFans sizing and measurements, read Chinese size charts, compare garment dimensions, verify shoe length and reduce costly sizing mistakes before shipping.
GoGo Finder
7/14/202610 min read
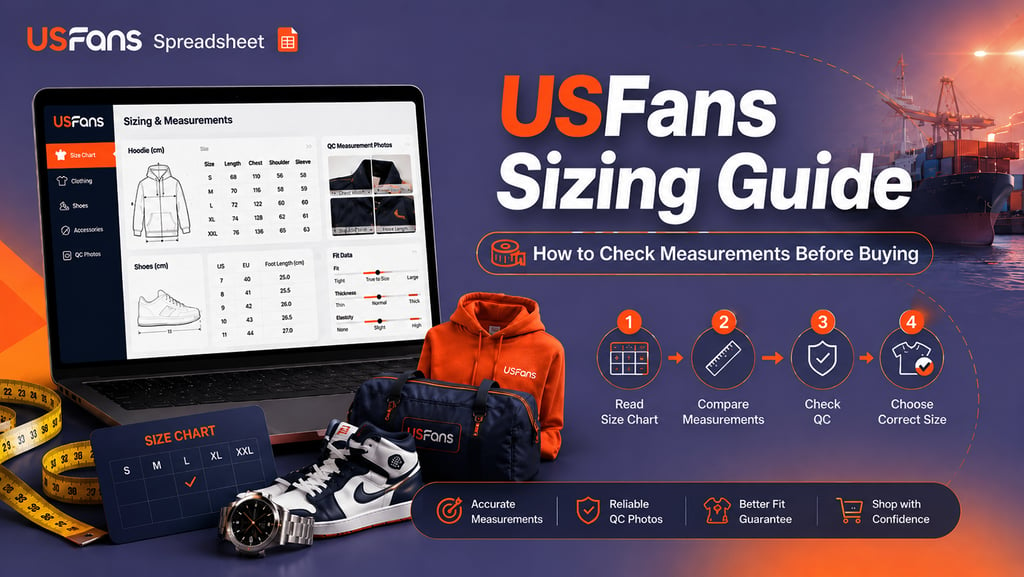
Choosing the correct size is one of the most important parts of buying through the USFans Spreadsheet.
A product may look suitable in listing photos and pass a visual QC inspection, but it can still be unusable if the measurements do not match your body, clothing or footwear.
This is especially common when shopping from Taobao, Weidian and 1688 because size labels are not always consistent across sellers, factories or product batches.
A medium from one seller may fit like a small from another. Two pairs of shoes marked with the same size can also have different internal lengths.
The safest approach is to compare actual measurements rather than relying only on familiar size labels.
This guide explains how to read Chinese size charts, measure your own clothing, verify warehouse dimensions and reduce common sizing mistakes before international shipping.
Why Marketplace Sizing Can Be Inconsistent
Marketplace size labels are not controlled by one universal standard.
Different sellers may use:
Chinese sizing
Asian sizing
European sizing
US sizing
Factory-specific sizing
Custom product measurements
Even when the same label appears, the actual dimensions may vary.
For example, two hoodies labeled XL may have different:
Chest width
Shoulder width
Sleeve length
Total length
Intended fit
This variation can result from different factories, patterns, materials and product styles.
The label should therefore be treated as a reference only.
Actual measurements are more useful than the letter or number printed on the tag.
Size Labels vs Actual Measurements
A size label tells you what the seller calls the product.
A measurement tells you how large the product actually is.
This distinction matters because labels such as S, M, L and XL are not precise.
A better sizing process compares:
Seller size chart
Measurements of clothing or shoes you already own
Warehouse measurement photos where available
Your preferred fit
For example, if your current hoodie measures 58 cm across the chest and fits well, that measurement is more useful than simply choosing another hoodie marked “L.”
The same principle applies to trousers, jackets, shoes and bags.
Start with an Item You Already Own
The most reliable reference is usually a product you already own and like.
Choose an item that:
Fits the way you prefer
Has a similar shape
Uses a similar material
Belongs to the same product category
Lay the item flat on a level surface and measure it carefully.
Do not rely only on body measurements because garments require additional space for movement and fit.
For example, a chest body measurement is not the same as the width of a hoodie laid flat.
Using an existing garment gives you a practical target for comparison.
How to Measure a T-Shirt or Hoodie
For tops, the most useful measurements are usually:
Chest width
Shoulder width
Garment length
Sleeve length
Chest Width
Lay the garment flat and measure from one armpit seam to the other.
This is often called pit-to-pit measurement.
Some size charts list the full chest circumference rather than flat width.
If the chart gives circumference, divide it by two before comparing it with a flat garment measurement.
For example:
116 cm chest circumference ÷ 2 = 58 cm flat chest width
This conversion prevents one of the most common sizing errors.
Shoulder Width
Measure straight across the back from one shoulder seam to the other.
Shoulder width affects how the garment sits on the upper body.
A difference of one or two centimeters can change the fit significantly, especially on structured jackets.
Garment Length
Measure from the highest point near the shoulder or collar down to the bottom hem.
Check how the seller defines length because some charts measure from the back collar while others measure from the shoulder.
Sleeve Length
Measure from the shoulder seam to the end of the cuff.
For raglan sleeves, the measurement may begin from the collar rather than a shoulder seam.
Always compare the seller’s measurement method with your own.
How to Measure Jackets
Jackets require more attention because lining, padding and outer structure can affect fit.
Useful jacket measurements include:
Chest width
Shoulder width
Back length
Sleeve length
Hem width
Cuff width
If the jacket is designed for layering, compare it with another jacket rather than a thin shirt.
A jacket that matches your T-shirt measurements may feel too tight when worn over other clothing.
Also consider the material.
A rigid denim or leather-style jacket provides less flexibility than a soft knit or stretch fabric.
How to Measure Pants and Shorts
For trousers and shorts, useful measurements include:
Waist width
Hip width
Front rise
Back rise
Thigh width
Inseam
Outseam
Leg opening
Waist Width
Lay the waistband flat without stretching it.
Measure from one side to the other.
If the waist is elastic, check whether the size chart lists:
Relaxed measurement
Maximum stretched measurement
Recommended body waist
These figures are not interchangeable.
Inseam
Measure from the crotch seam down to the bottom of the leg.
This helps determine leg length.
Outseam
Measure from the top of the waistband to the bottom hem along the outside edge.
Outseam includes the rise, so it is different from inseam.
Thigh Width
Measure across the upper leg section, usually just below the crotch.
This is especially important for slim or tapered trousers.
How to Measure Shoes
Shoe sizing should focus on internal length rather than only the printed size.
Useful figures include:
Foot length
Insole length
Internal shoe length
Width where available
Measure your foot while standing because body weight can slightly increase its length and width.
Place your heel against a wall and measure from the wall to the longest toe.
Measure both feet and use the larger result.
Do not automatically choose a shoe with an internal length exactly equal to your foot length.
Most footwear needs a small amount of additional space.
The correct allowance depends on:
Shoe type
Sock thickness
Foot width
Preferred fit
Manufacturer guidance
A seller size chart may list foot length, insole length or outsole length. These are different measurements.
Confirm which one is being shown.
Foot Length, Insole Length and Outsole Length
These terms are often confused.
Foot Length
The length of your actual foot from heel to longest toe.
Insole Length
The length of the removable or internal footbed inside the shoe.
Outsole Length
The external length of the bottom sole.
Outsole length is usually not useful for selecting a size because it includes the shoe structure around the foot.
When possible, compare your foot length with the seller’s recommended foot length or the internal measurement.
If the seller only provides insole length, compare it with the insole of a shoe that already fits you.
How to Read a Chinese Size Chart
Chinese size charts may use centimeters and can include translated or abbreviated column names.
Common terms may refer to:
Length
Bust or chest
Shoulder
Sleeve
Waist
Hip
Thigh
Foot length
Before choosing a size:
Identify whether measurements are flat or full circumference
Check whether the unit is centimeters
Confirm where each measurement begins and ends
Compare at least two important dimensions
Review any seller notes about manual measurement error
Do not choose a size based on height and weight recommendations alone.
Height and weight can provide a general suggestion, but they do not account for body proportions or preferred fit.
Actual garment measurements are more dependable.
Understand Flat Measurements and Circumference
Many clothing charts use one of two systems:
Flat width
Full circumference
A flat chest width of 58 cm represents approximately 116 cm around the garment.
A full waist circumference of 80 cm represents approximately 40 cm when laid flat.
If you compare a flat measurement with a full circumference without converting it, the result will be incorrect.
Look for clues in the numbers.
For example, a hoodie chest measurement of 58 cm is probably flat width. A chest measurement of 116 cm is probably circumference.
When uncertain, compare the figures with the product photo or ask for clarification.
Allow for Measurement Error
Marketplace size charts often include a tolerance such as:
1–3 cm manual measurement error
This means the actual item may differ slightly from the listed figure.
Small variation can result from:
Manual measuring
Fabric movement
Product shape
Production tolerance
Different measurement positions
Do not assume the listed number is exact.
If your required fit depends on a one-centimeter difference, the product may be too risky.
Choose a size with enough margin to remain suitable within the stated tolerance.
Consider Material Stretch
Measurements do not tell the complete story.
Material behavior also affects fit.
Stretch fabrics may include:
Elastane
Spandex
Rib knit
Elastic waistbands
Flexible woven blends
Rigid materials may include:
Non-stretch denim
Heavy canvas
Structured synthetic leather
Thick woven fabric
Two garments with identical measurements can feel different if one stretches and the other does not.
Review the material description and product photos.
If the fabric has limited stretch, allow more room.
If it is highly elastic, check both relaxed and stretched measurements where available.
Consider Intended Fit
The same measurement can produce different results depending on the product design.
Common fit types include:
Slim fit
Regular fit
Relaxed fit
Oversized fit
Cropped fit
An oversized hoodie is designed to measure wider than the wearer’s body.
A slim jacket may intentionally have less extra room.
Do not assume that a larger measurement means the size is incorrect.
Compare the item with a similar product that has the fit you want.
The seller’s model photos may help show intended proportions, but they should not replace measurements.
Check Model Information Carefully
Listings sometimes include the model’s:
Height
Weight
Worn size
This can provide context, but it is not a precise sizing method.
Two people with the same height and weight can have different:
Shoulder width
Chest size
Leg length
Waist measurement
Body proportions
Model information is most useful when combined with garment measurements.
Use it to understand whether the product is intended to fit loose, regular or tight.
Use Historical QC Measurements
Previous warehouse measurement photos can provide useful evidence about actual sizing.
They may reveal whether:
The seller’s size chart is accurate
The product runs shorter or wider
The same size varies between orders
A particular batch has changed
Measurements are reasonably consistent
Compare several examples rather than relying on one image.
One item may be measured slightly differently by warehouse staff.
Repeated differences across several orders are more meaningful.
For example, if a seller lists a garment length of 72 cm but several QC measurements show 68–69 cm, the chart may not reflect the current product accurately.
Request Warehouse Measurements When Needed
Standard QC photos may not always include the dimensions you need.
Additional measurements may be worthwhile when:
Fit is critical
The seller chart is unclear
Historical QC shows variation
The product is expensive
Returns are limited
The item has unusual proportions
Make the request specific.
Instead of asking:
Please measure the item.
Use:
Please measure chest width from armpit to armpit while the hoodie is laid flat.
Or:
Please measure the removable insole from heel to toe.
Specific instructions reduce the chance of receiving an unusable measurement.
Check Measurement Method in QC Photos
A measurement photo is only useful when the measuring tape is positioned correctly.
Check whether:
The product is laid flat
The tape begins at zero
The tape follows a straight line
Fabric is not stretched
The correct reference points are used
The full measurement is visible
A tape placed diagonally can produce a larger result.
A garment that is folded or wrinkled can produce an inaccurate width.
If the photo does not clearly show the method, request clarification before making a final decision.
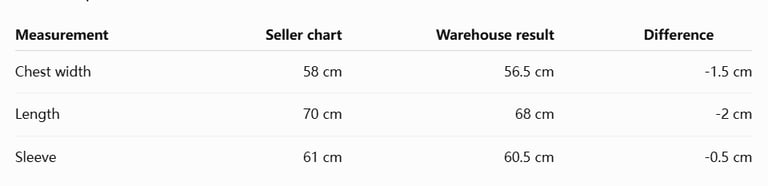
Compare Seller Chart with Warehouse Measurement
When the product reaches the warehouse, compare the actual measurement with the original chart.
Use a simple table:
Then decide whether the difference is acceptable.
A small difference may fall within normal tolerance.
A larger difference may affect fit and justify an exchange or return.
Prioritize the measurements most important to you.
For a hoodie, chest and length may matter most. For trousers, waist and inseam may be more important.
Account for Washing and Shrinkage
Some materials can shrink after washing.
Cotton garments may become slightly smaller depending on:
Fabric treatment
Washing temperature
Drying method
Construction
Seller listings do not always provide reliable shrinkage information.
If a cotton product already measures at the minimum acceptable size before washing, it may become unsuitable later.
Allow some margin where shrinkage is possible.
Follow the care instructions shown on the label when available.
Do Not Size Up Automatically
A common recommendation is to “size up,” but this advice is too general.
Sizing up without checking measurements can result in:
Excessive width
Sleeves that are too long
Incorrect shoulder fit
Poor garment proportions
Shoes that move while walking
Some products run small, while others are intentionally oversized.
The correct choice depends on actual dimensions.
Use the size chart first, then consider whether sizing up is necessary.
Do Not Rely Only on Reviews
Customer comments can provide useful context, but fit descriptions are subjective.
One buyer may describe a product as small because they prefer a loose fit.
Another may call the same fit accurate because they prefer it close to the body.
Reviews are more useful when they include:
Body measurements
Purchased size
Actual garment measurements
Product photos
Specific fit comments
General statements such as “fits perfectly” are difficult to apply to another buyer.
Common Clothing Sizing Mistakes
Avoid these errors:
Choosing only by S, M, L or XL
Comparing body circumference with flat garment width
Ignoring shoulder and sleeve measurements
Using height and weight as the only guide
Forgetting measurement tolerance
Ignoring material stretch
Assuming all sellers use the same size system
Not checking warehouse measurements
Choosing the same size across different batches
Sizing up automatically without comparison
A correct size decision should be based on several measurements, not one label.
Common Shoe Sizing Mistakes
Shoe errors often come from confusing different length measurements.
Avoid:
Using outsole length
Measuring only one foot
Choosing exact foot length with no allowance
Ignoring foot width
Assuming EU or US labels are standardized
Comparing shoe size without checking internal length
Ignoring thick socks or insoles
Approving shoes without checking the size tag
For footwear, internal length and width are usually more useful than the printed size number.
When to Accept the Size
The product may be suitable when:
Key measurements match your target
Differences fall within normal tolerance
The intended fit is acceptable
Material stretch has been considered
The warehouse measurement method is clear
The size tag matches the order
Do not expect every measurement to match perfectly.
Focus on whether the final dimensions support the fit you want.
When to Request an Exchange or Return
Consider an exchange or return when:
The wrong size was received
Key measurements differ significantly
The item falls outside the seller’s tolerance
The selected size no longer fits your requirements
Shoe internal length is unsuitable
The product proportions differ from the listing
A measurement request confirms a major problem
Act before international shipping.
Once the item has left the warehouse, correcting a sizing issue is usually difficult and expensive.
Practical USFans Sizing Checklist
Before ordering:
Measure a similar item you already own
Read the full seller size chart
Confirm flat width versus circumference
Check the measurement units
Review material and stretch
Consider intended fit
Compare historical QC measurements
Allow for seller tolerance
Confirm shoe internal length where relevant
After warehouse arrival:
Check the size tag
Review measurement photos
Confirm the tape placement
Compare actual results with the chart
Request missing measurements
Decide whether differences affect fit
Return or exchange before parcel submission if necessary
Final Thoughts
The most reliable way to choose a size through the USFans Spreadsheet is to stop thinking mainly in terms of labels.
S, M, L, EU 42 and US 9 are useful references, but they do not guarantee consistent dimensions across sellers or batches.
A stronger sizing process is:
Measure an item you already own
Read the seller’s size chart
Convert flat and full measurements correctly
Consider fabric and intended fit
Review historical QC measurements
Verify the actual warehouse item
Return or exchange before international shipping if needed
Sizing mistakes are easier to prevent than correct after delivery.
A few minutes spent comparing measurements can save the cost and frustration of receiving a product that cannot be used.
Frequently Asked Questions
Does USFans use Chinese sizing?
Products found through USFans may use Chinese, Asian, European, US or seller-specific sizing. Always check the individual listing’s measurements.
Should I always choose one size larger?
No. Some products run small, while others are oversized. Compare actual measurements instead of following a general size-up rule.
Is chest measurement flat or around the body?
It depends on the seller’s chart. A smaller number such as 58 cm is often flat width, while 116 cm may be full circumference.
How should I measure clothing I already own?
Lay it flat without stretching and measure between the same reference points used in the seller chart.
What shoe measurement should I use?
Use foot length or internal shoe length. Outsole length is generally not useful for choosing a size.
Are warehouse measurements exact?
They are useful but may include small manual differences. Check that the item is flat and the tape is positioned correctly.
Can the same size vary between batches?
Yes. Different production runs can have different measurements even when the size label remains the same.
Can I exchange an item if the measurements are wrong?
An exchange or return may be possible before international shipping, depending on the seller’s policy, return deadline and shopping-service rules.
Recommended Links
→ Browse the USFans Spreadsheet
→ Explore USFans Spreadsheet Guides